Testing Codeigniter 3.0 applications with PHPUnit

Writing tests for CodeIgniter application is a bit difficult.

But I introduce an easier way to use PHPUnit with CodeIgniter 3.0.

(2016/02/28 Added) If you are not familiar with Testing, I recommend our Ebook. CodeIgniter Testing Guide. It is Beginners' Guide to Automated Testing in PHP.

Requirements

  • CodeIgniter 3.0
  • PHP 5.4 or later
  • PHPUnit

Setup

Step 1

Install CodeIgniter 3.0.0.

If you like Composer, I recommend to use CodeIgniter Composer Installer.

Step 2

Install CI PHPUnit Test. Download latest version from https://github.com/kenjis/ci-phpunit-test/releases and unzip it. Copy application/tests folder into application folder.

CodeIgniter-3.0.0/
└── application/
    └── tests/

If you like Composer:

$ cd CodeIgniter-3.0.0/
$ composer require kenjis/ci-phpunit-test --dev
$ php vendor/kenjis/ci-phpunit-test/install.php

Step 3

(2015/06/15 Added) You don't need this step on CI PHPUnit Test v0.1.1 and later. Go to Step 4.

Fix the three paths in tests/Bootstrap.php if you need. If you used CodeIgniter Composer Installer, you don't have to change.

    $system_path = '../../vendor/codeigniter/framework/system';

    $application_folder = '../../application';

    define('FCPATH', realpath(dirname(__FILE__).'/../../public').'/');

If you use CodeIgniter 3.0 default folder structure. You have to change like below:

--- a/application/tests/Bootstrap.php
+++ b/application/tests/Bootstrap.php
@@ -102,7 +102,7 @@ switch (ENVIRONMENT)
  * Include the path if the folder is not in the same directory
  * as this file.
  */
-   $system_path = '../../vendor/codeigniter/framework/system';
+   $system_path = '../../system';

 /*
  *---------------------------------------------------------------
@@ -230,7 +230,7 @@ switch (ENVIRONMENT)
    define('BASEPATH', str_replace('\\', '/', $system_path));

    // Path to the front controller (this file)
-   define('FCPATH', realpath(dirname(__FILE__).'/../../public').'/');
+   define('FCPATH', realpath(dirname(__FILE__).'/../..').'/');

    // Name of the "system folder"
    define('SYSDIR', trim(strrchr(trim(BASEPATH, '/'), '/'), '/'));

Step 4

Install PHPUnit. See https://phpunit.de/manual/4.7/en/installation.html.

Now you're ready to write and run tests.

How to Write Tests

Controllers

tests/controllers/Welcome_test.php

<?php

class Welcome_test extends TestCase
{
    public function test_index()
    {
        $output = $this->request('GET', ['Welcome', 'index']);
        $this->assertContains('<title>Welcome to CodeIgniter</title>', $output);
    }
}

Models

(2016/01/11 Updated) Updated code in setUp().

tests/models/Inventory_model_test.php

<?php

class Inventory_model_test extends TestCase
{
    public function setUp()
    {
        $this->resetInstance();
        $this->CI->load->model('shop/Inventory_model');
        $this->obj = $this->CI->Inventory_model;
    }

    public function test_get_category_list()
    {
        $expected = [
            1 => 'Book',
            2 => 'CD',
            3 => 'DVD',
        ];
        $list = $this->obj->get_category_list();
        foreach ($list as $category) {
            $this->assertEquals($expected[$category->id], $category->name);
        }
    }

    public function test_get_category_name()
    {
        $actual = $this->obj->get_category_name(1);
        $expected = 'Book';
        $this->assertEquals($expected, $actual);
    }
}

If you want to know how to write tests more, see https://github.com/kenjis/ci-phpunit-test/blob/master/docs/HowToWriteTests.md.

How to Run Tests

$ cd CodeIgniter-3.0.0/application/tests/
$ phpunit
PHPUnit 4.6.10 by Sebastian Bergmann and contributors.

Configuration read from /.../codeigniter/application/tests/phpunit.xml

...

Time: 635 ms, Memory: 4.50Mb

OK (3 tests, 4 assertions)

Generating code coverage report in Clover XML format ... done

Generating code coverage report in HTML format ... done

To generate coverage report, Xdebug is needed.

Summary

  • Installing CI PHPUnit Test is very easy. You don't have to modify CodeIgniter core files.
  • You can write controller tests easily using CI PHPUnit Test.
  • You could probably write tests for your application with 100% coverage using CI PHPUnit Test.
References

Tags: english

Phalcon PHPフレームワーク Sense of Use/PHPカンファレンス関西2015

PHPカンファレンス関西2015でのPhalconのセッション「Phalcon PHPフレームワーク Sense of Use」の動画を観ました。

感想

Phalconでハマるところは?という質問への回答が「コントローラでのアクションにActionという接尾辞を付けないといけないこと」みたいな内容だったのが印象的でした。

<?php

use Phalcon\Mvc\Controller;

class IndexController extends Controller
{

    public function indexAction()   // ← Actionを忘れるとアクセスできない
    {
        echo "<h1>Hello!</h1>";
    }

}

その程度のことくらいしかとくにハマるところはなかったということで、それくらい安定していると理解されます。

Phalcon 1から2への移行

Phalcon 2は1.3.4とほぼAPI互換です。

Most of the development of Phalcon 2 has been focused on maintaining backwards compatibility with 1.3 and thus make the upgrade as easy as possible. However being a different version with many internal changes, existing applications may require some minor changes.
https://blog.phalconphp.com/post/guide-upgrading-to-phalcon-2

後方互換性を維持することにフォーカスしてPhalcon 2は開発されたので、アップグレードはかなりスムーズになるはずですが、内部はたくさん変わっているのでいくつかのマイナーな変更は必要になるかもしれません。

ということで、変更が必要そうな点がいくつか上記のブログで紹介されています。

テストを整備して、きちんとテストしてから2に移行するということは大切ですが、移行自体はそんなに大変じゃないんじゃないかと思います。

関連

Tags: phalcon

CodeIgniter 3.0で認証ライブラリIon Authを使う

CodeIgniterで現在最も使われていると思われる認証ライブラリIon Authをインストールします。

Ion Authのインストール

手動でのインストール

まず、CodeIgniter 3.0をインストールします。

そして、http://github.com/benedmunds/CodeIgniter-Ion-Auth/zipball/2 をダウンロードして展開します。

中身をCodeIgniterの対応するフォルダにコピーします。

Composerでのインストール

CodeIgniter 3.0をcodeigniter-composer-installerでインストールします。

$ composer create-project kenjis/codeigniter-composer-installer ci-ion-auth

Ion Authをインストールします。

$ cd ci-ion-auth
$ php bin/install.php ion-auth 2

ファイル名の修正

CodeIgniter 3.0の規約に合わせてクラスファイルのファイル名の先頭を大文字にします。

application/controllers/auth.php      -> application/controllers/Auth.php
application/models/ion_auth_model.php -> application/models/Ion_auth_model.php

テーブルの作成

まず、CodeIgniterのデータベース接続設定を済ませてください。

それから、application/sql/ion_auth.sqlでMySQLにIon Auth用のテーブルを作成します。

そのままでもいいのですが、わかりやすいようにテーブル名に接頭辞ia_を追加することにします。

--- a/application/sql/ion_auth.sql
+++ b/application/sql/ion_auth.sql
@@ -1,10 +1,10 @@
-DROP TABLE IF EXISTS `groups`;
+DROP TABLE IF EXISTS `ia_groups`;

 #
 # Table structure for table 'groups'
 #

-CREATE TABLE `groups` (
+CREATE TABLE `ia_groups` (
   `id` mediumint(8) unsigned NOT NULL AUTO_INCREMENT,
   `name` varchar(20) NOT NULL,
   `description` varchar(100) NOT NULL,
@@ -15,19 +15,19 @@ CREATE TABLE `groups` (
 # Dumping data for table 'groups'
 #

-INSERT INTO `groups` (`id`, `name`, `description`) VALUES
+INSERT INTO `ia_groups` (`id`, `name`, `description`) VALUES
      (1,'admin','Administrator'),
      (2,'members','General User');


-DROP TABLE IF EXISTS `users`;
+DROP TABLE IF EXISTS `ia_users`;

 #
 # Table structure for table 'users'
 #

-CREATE TABLE `users` (
+CREATE TABLE `ia_users` (
   `id` int(11) unsigned NOT NULL AUTO_INCREMENT,
   `ip_address` varchar(15) NOT NULL,
   `username` varchar(100) NOT NULL,
@@ -53,17 +53,17 @@ CREATE TABLE `users` (
 # Dumping data for table 'users'
 #

-INSERT INTO `users` (`id`, `ip_address`, `username`, `password`, `salt`, `email`, `activation_code`, `forgotten_password_code`, `created_on`, `last_login`, `active`, `first_name`, `last_name`, `company`, `phone`) VALUES
+INSERT INTO `ia_users` (`id`, `ip_address`, `username`, `password`, `salt`, `email`, `activation_code`, `forgotten_password_code`, `created_on`, `last_login`, `active`, `first_name`, `last_name`, `company`, `phone`) VALUES
      ('1','127.0.0.1','administrator','$2a$07$SeBknntpZror9uyftVopmu61qg0ms8Qv1yV6FG.kQOSM.9QhmTo36','','admin@admin.com','',NULL,'1268889823','1268889823','1', 'Admin','istrator','ADMIN','0');


-DROP TABLE IF EXISTS `users_groups`;
+DROP TABLE IF EXISTS `ia_users_groups`;

 #
 # Table structure for table 'users_groups'
 #

-CREATE TABLE `users_groups` (
+CREATE TABLE `ia_users_groups` (
   `id` int(11) unsigned NOT NULL AUTO_INCREMENT,
   `user_id` int(11) unsigned NOT NULL,
   `group_id` mediumint(8) unsigned NOT NULL,
@@ -71,22 +71,22 @@ CREATE TABLE `users_groups` (
   KEY `fk_users_groups_users1_idx` (`user_id`),
   KEY `fk_users_groups_groups1_idx` (`group_id`),
   CONSTRAINT `uc_users_groups` UNIQUE (`user_id`, `group_id`),
-  CONSTRAINT `fk_users_groups_users1` FOREIGN KEY (`user_id`) REFERENCES `users` (`id`) ON DELETE CASCADE ON UPDATE NO ACTION,
-  CONSTRAINT `fk_users_groups_groups1` FOREIGN KEY (`group_id`) REFERENCES `groups` (`id`) ON DELETE CASCADE ON UPDATE NO ACTION
+  CONSTRAINT `fk_users_groups_users1` FOREIGN KEY (`user_id`) REFERENCES `ia_users` (`id`) ON DELETE CASCADE ON UPDATE NO ACTION,
+  CONSTRAINT `fk_users_groups_groups1` FOREIGN KEY (`group_id`) REFERENCES `ia_groups` (`id`) ON DELETE CASCADE ON UPDATE NO ACTION
 ) ENGINE=InnoDB DEFAULT CHARSET=utf8;

-INSERT INTO `users_groups` (`id`, `user_id`, `group_id`) VALUES
+INSERT INTO `ia_users_groups` (`id`, `user_id`, `group_id`) VALUES
      (1,1,1),
      (2,1,2);


-DROP TABLE IF EXISTS `login_attempts`;
+DROP TABLE IF EXISTS `ia_login_attempts`;

 #
 # Table structure for table 'login_attempts'
 #

-CREATE TABLE `login_attempts` (
+CREATE TABLE `ia_login_attempts` (
   `id` int(11) unsigned NOT NULL AUTO_INCREMENT,
   `ip_address` varchar(15) NOT NULL,
   `login` varchar(100) NOT NULL,

テーブル名を変更したので設定ファイルでも変更します。

--- a/application/config/ion_auth.php
+++ b/application/config/ion_auth.php
@@ -27,10 +27,10 @@
 | -------------------------------------------------------------------------
 | Database table names.
 */
-$config['tables']['users']           = 'users';
-$config['tables']['groups']          = 'groups';
-$config['tables']['users_groups']    = 'users_groups';
-$config['tables']['login_attempts']  = 'login_attempts';
+$config['tables']['users']           = 'ia_users';
+$config['tables']['groups']          = 'ia_groups';
+$config['tables']['users_groups']    = 'ia_users_groups';
+$config['tables']['login_attempts']  = 'ia_login_attempts';

 /*
  | Users table column and Group table column you want to join WITH.

これで準備完了です。

サンプルページ

サンプルページが付属していますので、ブラウザでアクセスしてみます。

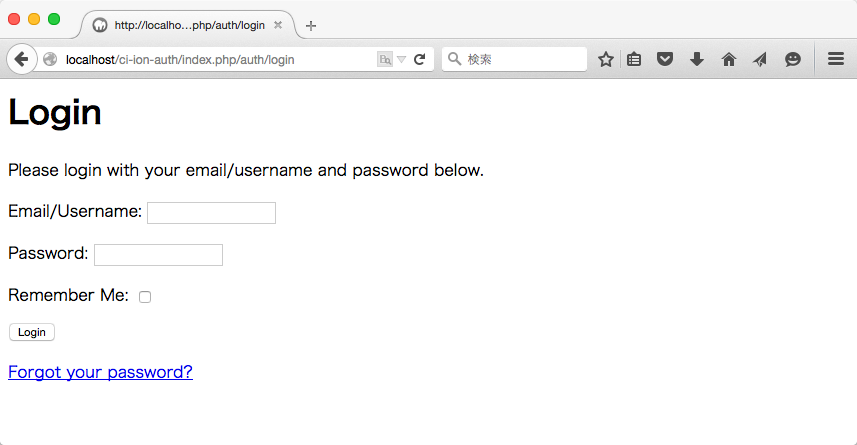
/auth/loginにアクセスします。

以下のデフォルトの管理者でログインします。

  ユーザ名:admin@admin.com
パスワード:password

ログインできると/にリダイレクトされます。

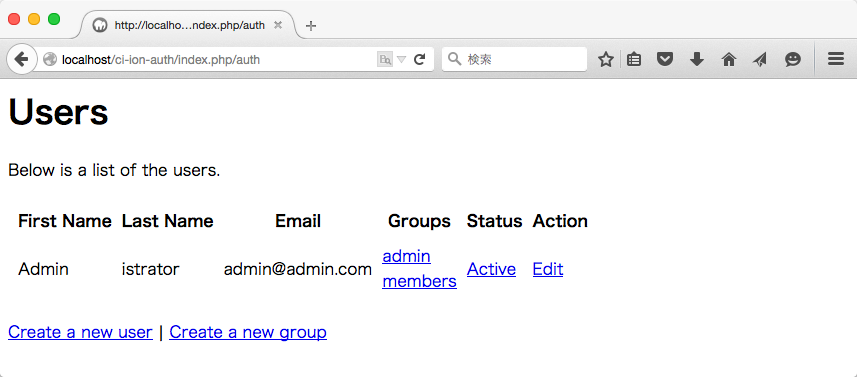
/authにアクセスするとユーザの一覧が表示されます。

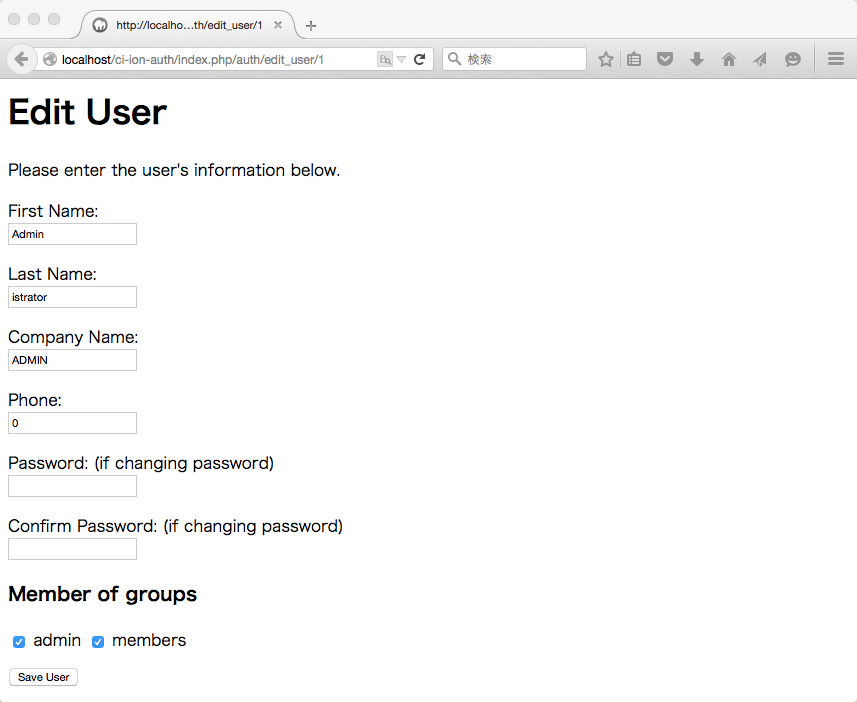
「Edit」を押すとユーザの情報を変更できます。

/auth/logoutにアクセスするとログアウトします。

ドキュメント

Ion Authのドキュメントは以下にあります(英語)。

関連

Tags: codeigniter, database, auth