BEAR.Sundayでコンタクトフォームを作ってみる②
BEAR.Sundayでコンタクトフォームを作ってみる①の続きです。
いよいよフォームの作成に入ります。
コンタクトフォームのテンプレートの作成
ページリソースContact用のTwigテンプレートを作成します。
src/Resource/Page/Contact.twig
<!DOCTYPE html>
<html lang="ja">
<head>
    <meta charset="utf-8">
    <title>BEAR.Sunday Contact Form</title>
    <link href="//netdna.bootstrapcdn.com/bootstrap/3.1.1/css/bootstrap.min.css" rel="stylesheet">
    <script src="//netdna.bootstrapcdn.com/bootstrap/3.1.1/js/bootstrap.min.js"></script>
</head>
<body>
<div class="container">
    <h1>Contact Form</h1>

{% if code == 201 %}
    <p>
    Name: {{ name }}<br>
    Email: {{ email }}<br>
    Comment: {{ comment }}
    </p>
    <p>Thank you!</p>
{% else %}
    <form role="form" action="" method="post" enctype="multipart/form-data">
        <div class="form-group{%if form['name']['error'] %} has-error{% endif %}">
            <label class="control-label" for="name">Name</label>
            <input id="name" type="text" name="name" class="form-control" size="20" maxlength="50" value="{{ form['name']['value'] }}" />
            <label class="control-label" for="name">{{ form['name']['error'] }}</label>
        </div>

        <div class="form-group{%if form['email']['error'] %} has-error{% endif %}">
            <label class="control-label" for="email">Email</label>
            <input id="email" type="text" name="email" class="form-control" size="20" maxlength="100" value="{{ form['email']['value'] }}" />
            <label class="control-label" for="email">{{ form['email']['error'] }}</label>
        </div>

        <div class="form-group{%if form['comment']['error'] %} has-error{% endif %}">
            <label class="control-label" for="comment">Comment</label>
            <textarea id="comment" name="comment" class="form-control" cols="40" rows="5">{{ form['comment']['value'] }}</textarea>
            <label class="control-label" for="comment">{{ form['comment']['error'] }}</label>
        </div>

        <input class="btn btn-default" type="submit" name="submit" value="Send">
    </form>
{% endif %}

</div>
</body>
</html>
codeの値により、送信完了時と送信前のフォームの表示を切り替えています。
ページコントローラの作成
ページコントローラContactを作成します。
以下のように変更します。
src/Resource/Page/Contact.php
<?php
/**
 * Kenjis.Contact
 *
 * @author     Kenji Suzuki <https://github.com/kenjis>
 * @license    MIT License
 * @copyright  2014 Kenji Suzuki
 * @link       https://github.com/kenjis/Kenjis.Contact
 */

namespace Kenjis\Contact\Resource\Page;

use BEAR\Resource\ResourceObject;
use Ray\Di\Di\Inject;
use Kenjis\Contact\Service\SwiftMailerFactory;
use BEAR\Resource\Code;

class Contact extends ResourceObject
{
    /**
     * @Inject
     */
    public function __construct(SwiftMailerFactory $mailer)
    {
        $this->mailer = $mailer;
    }

    public function onGet()
    {
        return $this;
    }

    public function onPost($name, $email, $comment)
    {
        if (! $this->validation($name, $email, $comment)) {
            return $this;
        }

        $this->sendmail($name, $email, $comment);

        $this['code'] = $this->code = Code::CREATED;
        $this['name']    = $name;
        $this['email']   = $email;
        $this['comment'] = $comment;

        return $this;
    }

    private function validation($name, $email, $comment)
    {
        $pass = true;

        if ((mb_strlen($name) == 0) || (mb_strlen($name) > 50)) {
            $this->body['form']['name']['error'] = 'Enter your name (max 50 letters).';
            $pass = false;
        }

        if ((mb_strlen($email) > 100) || ! filter_var($email, FILTER_VALIDATE_EMAIL)) {
            $this->body['form']['email']['error'] = 'Enter your email adrress (max 100 letters).';
            $pass = false;
        }

        if ((mb_strlen($comment) == 0) || (mb_strlen($comment) > 400)) {
            $this->body['form']['comment']['error'] = 'Enter comment (max 400 letters).';
            $pass = false;
        }

        if (! $pass) {
            $this->body['form']['name']['value']    = $name;
            $this->body['form']['email']['value']   = $email;
            $this->body['form']['comment']['value'] = $comment;
        }

        return $pass;
    }

    private function sendmail($name, $email, $comment)
    {
        $data = [
            'name'    => $name,
            'email'   => $email,
            'comment' => $comment,
        ];

        $mailer = $this->mailer->create();
        $mailer->setSubject('コンタクトフォーム')
            ->setFrom($data['email'], $data['name'])
            ->setTo('admin@example.org', '管理者')
            ->setTemplate('mailer/contact_form.twig', $data);

//        echo '<pre>'
//            . htmlspecialchars($mailer, ENT_QUOTES, 'UTF-8')
//            . '</pre>';

        $result = $mailer->send();
        return $result;
    }
}
POST時に実行されるonPost()メソッドを追加し、入力データの検証をvalidation()メソッドに、メール送信処理はsendmail()メソッドに分離しています。
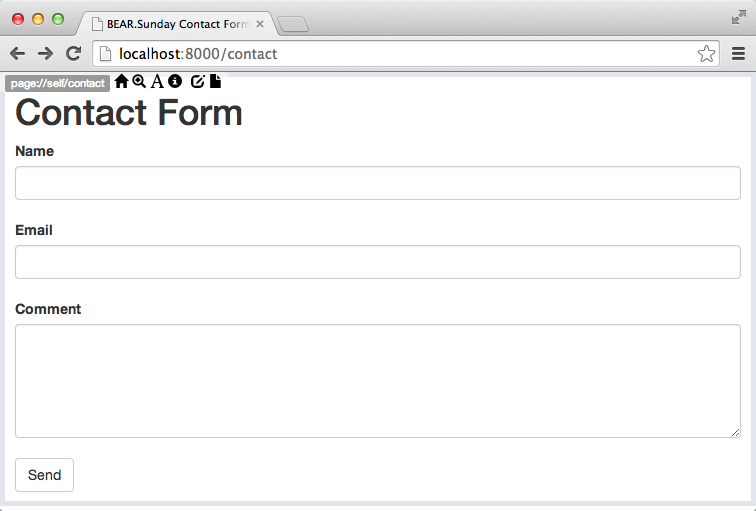
これで、http://0.0.0.0:8000/contact にブラウザからアクセスすると、次のようなコンタクトフォームが表示されます。
▼コンタクトフォーム
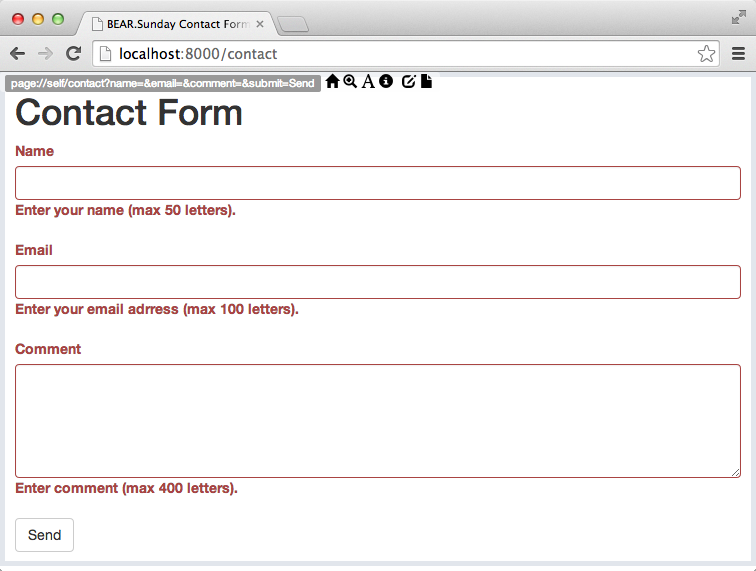
何も入力せずに[Send]ボタンを押すと、検証エラーが表示されます。
▼検証エラー
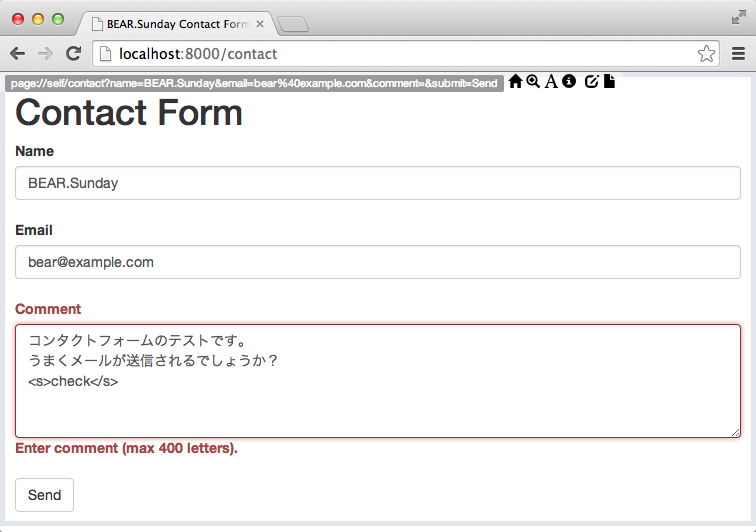
入力してみます。
▼コンタクトフォーム入力中
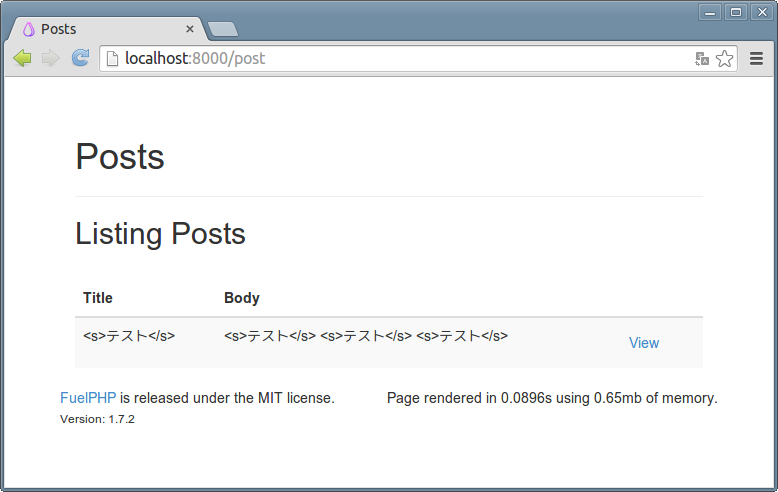
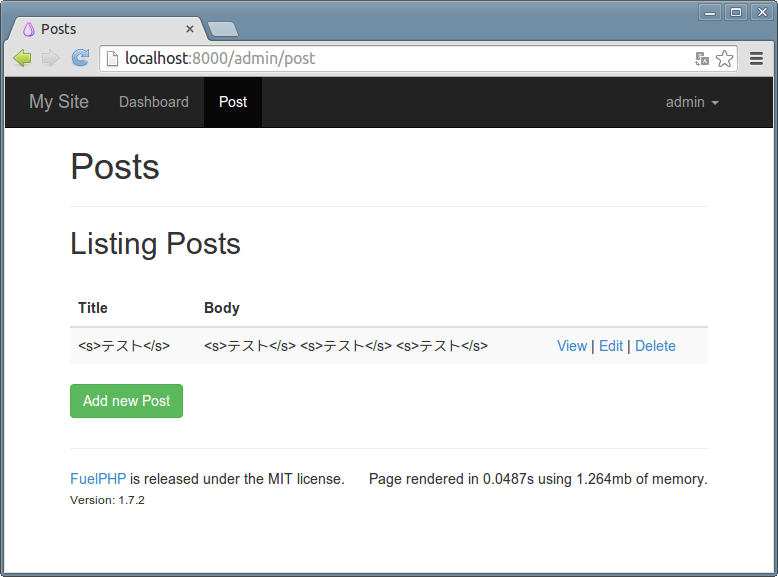
[Send]ボタンを押すと、今度は送信されたようです。
▼送信完了
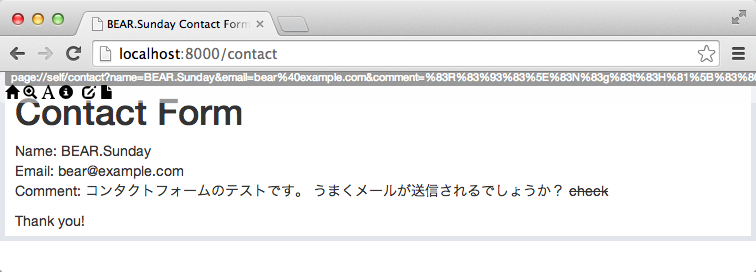
おっと、「check」に取り消し線が引かれています。HTMLタグが有効になってしまっています。
つまり、このコンタクトフォームにはXSS脆弱性があるということになります。ついでに、CSRF対策もしてませんが、今日はここまでにします。
BEAR.Sundayでコンタクトフォームを作ってみる③へ続く。
過去記事
- BEAR.Sundayでコンタクトフォームを作ってみる① BEAR.SundayのインストールとSwiftMailerによるメール送信
- BEAR.Sundayでコンタクトフォームを作ってみる② フォームの作成 ←今ここ
 環境構築編")
 入門編")
 実践編")
![徹底攻略PHP5技術者認定[上級]試験問題集 [PJ0-200]対応](http://tatsu-zine.com/images/books/164/cover_s.jpg "徹底攻略PHP5技術者認定[上級]試験問題集 [PJ0-200]対応")

