GitHubでのコミットにGPG署名することを求められた場合
CodeIgniter Advent Calendar 2016 の7日目です。まだ、空きがありますので、興味のある方は気軽に参加してください。
現在開発中のCodeIgniter4へのPull Requestでは、commitにGPG署名が求められています。
これは、ソースコードの出所を証明するためのものです。
CodeIgniter3へのPull Requestでもgitのcommit -sによる署名が求めらています。
しかし、これは所詮コミットログに名前を入力するだけのものです。コミットログに認証があるわけではなくどんな文字列も記載可能ですから、究極的には誰がそのコミットをしたのかは証明できません。
commitにGPG署名すれば、少なくとも署名したアカウントをGitHubが証明してくれます。
それでは、commitにGPG署名をする方法を説明します。
GPGのインストール
以下から、GPGをダウンロードしてインストールします。
GPG鍵の作成
ターミナルから新しいGPG鍵を作成します。
$ gpg --gen-key
gpg (GnuPG/MacGPG2) 2.0.30; Copyright (C) 2015 Free Software Foundation, Inc.
This is free software: you are free to change and redistribute it.
There is NO WARRANTY, to the extent permitted by law.

Please select what kind of key you want:
   (1) RSA and RSA (default)
   (2) DSA and Elgamal
   (3) DSA (sign only)
   (4) RSA (sign only)
Your selection? 1
RSA keys may be between 1024 and 4096 bits long.
What keysize do you want? (2048) 4096
Requested keysize is 4096 bits
Please specify how long the key should be valid.
         0 = key does not expire
      <n>  = key expires in n days
      <n>w = key expires in n weeks
      <n>m = key expires in n months
      <n>y = key expires in n years
Key is valid for? (0)  ←無期限を選択
Key does not expire at all
Is this correct? (y/N) y

GnuPG needs to construct a user ID to identify your key.

Real name: Your Name ←名前を入力
Email address: your_address@example.jp  ←メアドを入力
Comment:
You selected this USER-ID:
    "Your Name <your_address@example.jp>"

Change (N)ame, (C)omment, (E)mail or (O)kay/(Q)uit? o
You need a Passphrase to protect your secret key.    ←秘密鍵のパスフレーズを入力

We need to generate a lot of random bytes. It is a good idea to perform
some other action (type on the keyboard, move the mouse, utilize the
disks) during the prime generation; this gives the random number
generator a better chance to gain enough entropy. ←マウスをぐるぐるする
gpg: key 28E5003B marked as ultimately trusted
public and secret key created and signed.

gpg: checking the trustdb
gpg: 3 marginal(s) needed, 1 complete(s) needed, PGP trust model
gpg: depth: 0  valid:   3  signed:   0  trust: 0-, 0q, 0n, 0m, 0f, 3u
gpg: next trustdb check due at 2018-08-19
pub   4096R/28E5003B 2016-12-07
      Key fingerprint = E870 21D3 2D61 240C B80A  F3F5 D29A 30C6 28E5 003B
uid       [ultimate] Your Name <your_address@example.jp>
sub   4096R/0F7D6F53 2016-12-07
これで鍵が作成されました。
アプリ「GPG Keychain」を起動すれば、作成した鍵が表示されるはずです。
公開鍵のGitHubへの登録
公開鍵をエクスポートします。
$ gpg -a --export your_address@example.com
これで公開鍵が出力されます。
-----BEGIN PGP PUBLIC KEY BLOCK-----
Comment: GPGTools - https://gpgtools.org

…略…
-----END PGP PUBLIC KEY BLOCK-----
GitHubへブラウザでアクセスし、右上の自分のアイコンから「Settings」を選び、「SSH and GPG keys」をクリックします。
「New GPG key」ボタンを押し、出力されたGPG公開鍵(-----BEGIN PGP PUBLIC KEY BLOCK-----から-----END PGP PUBLIC KEY BLOCK-----まで)をペーストし、追加します。
これで、GitHubにGPG公開鍵が登録されました。
Gitの設定
次に、GitにGPG公開鍵を設定します。
まず、鍵IDを確認します。
$ gpg --list-secret-keys --keyid-format LONG
以下の出力の場合、3AA5C34371567BD2が鍵 IDです。
/Users/hubot/.gnupg/secring.gpg
------------------------------------
sec   4096R/3AA5C34371567BD2 2016-03-10 [expires: 2017-03-10]
uid                          Hubot
ssb   4096R/42B317FD4BA89E7A 2016-03-10
その鍵をgitに設定します。
$ git config --global user.signingkey 3AA5C34371567BD2
これで、gitに公開鍵が設定されました。
CodeIgniter4リポジトリではデフォルトで署名するように設定する
GPG署名が求めらるリポジトリでは、デフォルトで署名するように設定しましょう。
$ cd CodeIgniter4/
$ git config commit.gpgsign true
署名が必要なときはGPG秘密鍵のパスフレーズの入力を求められます。
署名の仕方
デフォルトで署名する設定になっていないリポジトリの場合は、commit -Sでcommitに署名できます。
$ git commit -S
GPG秘密鍵のパスフレーズの入力を求められます。
ログの確認
--show-signatureオプションを付けると署名の情報が表示できます。
$ git log --show-signature
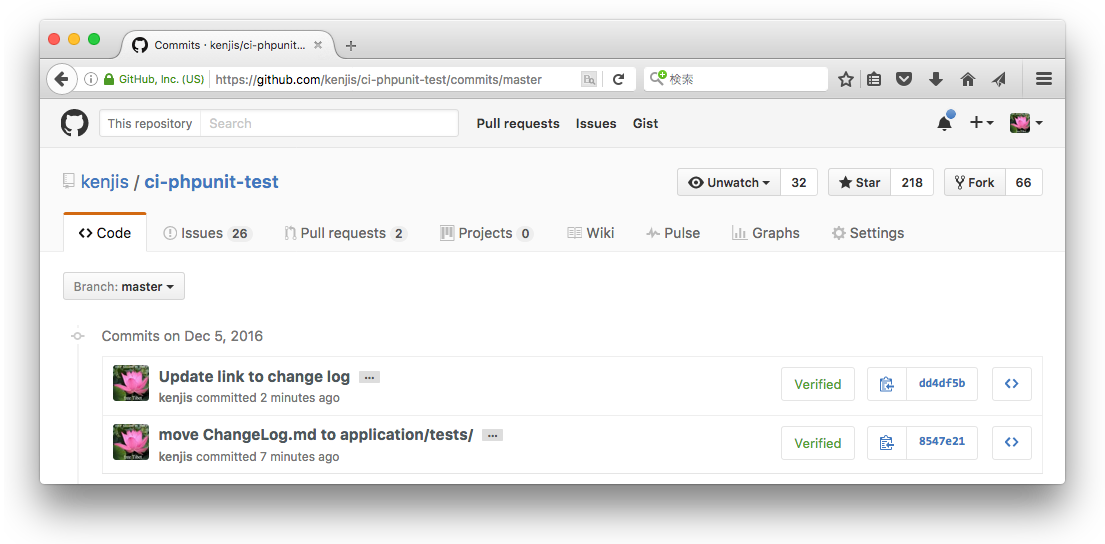
GitHubでの表示
GPG署名されたコミットには、以下のように「Verified」のマークが付きます。
この記事は、CodeIgniter Advent Calendar 2016 の7日目です。明日はayatoさんの「僕もget sparksしたかったよ」の予定です。
署名できなくなった場合
(2021-09-11 追記)
コミットすると以下のエラーが出て、コミットが失敗するようになりました。
error: gpg failed to sign the data
以下のコマンドを実行したら、再度、パスフレーズを求められ、コミットできるようになりました。
$ killall gpg-agent
関連
Date: 2016/12/07
 環境構築編")
 入門編")
 実践編")
![徹底攻略PHP5技術者認定[上級]試験問題集 [PJ0-200]対応](http://tatsu-zine.com/images/books/164/cover_s.jpg "徹底攻略PHP5技術者認定[上級]試験問題集 [PJ0-200]対応")

